vRealize Automation - Setting the Orchestrator Server using Custom Properties

We’re soon going to be implementing multiple vRealize Orchestrator (vRO) servers in our vRealize Automation (vRA) development environment to allow people to choose different endpoints. Essentially if someone’s working on a workflow, that shouldn’t affect a different developer who is testing a template. So I wanted a way of allowing customers (in this case, developers) to choose from a list of Orchestrator endpoints.
This might be useful in the following cases:
- Allowing specific customers to use their own Orchestrators (for example in different domains)
- Having multiple Development Orchestrators at various stages of “done”. So workflow developers can break workflows without hampering anyone else’s ability to deploy machines.
- Using a Development Orchestrator from Production. For example some of our customer’s Blueprints can’t be tested in DEV as we don’t have the same networks available.
Thankfully, using vRA Custom Properties, this isn’t too difficult to implement.
Before you start, you should be comfortable using Orchestrator with vRA. This isn’t a guide on how to set up vRA/vRO integration. Your vRO server must be set up with all the necessary prerequisites that it would need to work as an endpoint. If you’ve done this once, you’ve hopefully documented the process, so it’s just a case of replicating it on another server.
Create the vRO Endpoint in vRA
Assuming you haven’t already go multiple endpoints configured; the first thing you’re going to need to do is create one.
- Log into your vRealize Automation portal
- Navigate to Infrastructure > Endpoints > Endpoints
- Click New Endpoint > Orchestration > vCenter Orchestrator1. Name: Give it a useful name
- Address: use the FQDN of the server
- Credentials: Select existing credentials, or create new. Remember to use the format username@domain
- Custom properties: Create a new custom property named VMware.VCenterOrchestrator.Priority and give it a value. The value you give it depends on which order you would like vRA to attempt to use the server. You should probably set your most stable (production-ready) server with the lowest number.
Create the vRA Custom Property
You can add custom properties that apply to provisioned machines to the following elements:
- Reservation, to apply the custom properties to all machines provisioned from that reservation
- Business group, to apply the custom properties to all machines provisioned by business group members
- Blueprint, to apply the custom properties to all machines provisioned from the blueprint
- Build profile, which can be incorporated into any global or local blueprint, to apply the custom properties to all machines provisioned from the blueprint
If you’re going to set it in multiple places, be aware of the order of precedence.
- Wherever you decide to create the custom attribute, click New Property
- Create a new property with the Name VMware.VCenterOrchestrator.EndpointName
- Either leave the Value blank - or - if you want set it to whatever should be the default Orchestrator.
- Check the Prompt user box, and click the green checkmark to save your change before clicking OK
Create the vRA Property Dictionary entry
What we’ve done so far will create an empty text box on one or more blueprints, into which the user can enter an endpoint name. What we want to do next is provide them with a drop-down list of available endpoints.
- In vRA navigate to Infrastructure > Blueprints > Property Dictionary
- Click New Property Definition, set the name as VMware.VCenterOrchestrator.EndpointName.
- Set the Display name to something friendly like Orchestrator, and give it an appropriate description
- Set Control Type to DropDown, and click the Required check box
- Click the green checkmark to save your changes, then click Ok.
- Now, edit the Property Attributes of the Property Definition you just created. Click New Property Attribute
- Set the
TypetoValueList, and the name toVMware.VCenterOrchestrator.EndpointName. - Set the Value to be a comma-seperated list of your Orchestrator endpoint names (copy and paste so that you know you’re getting them right!)
- Click the green checkmark to save your changes, then click OK

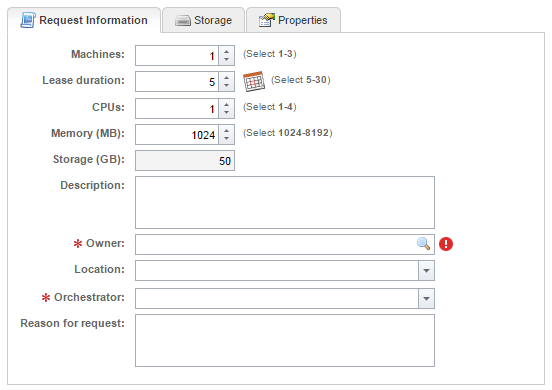
Now, test out a catalog request it should give you a drop-down list like this