VMware Aria Automation Orchestrator - Creating your first workflow
- What is VMware Aria Automation Orchestrator?
- How can Orchestrator help you?
- What can I automate with Orchestrator?
- Assumptions
- Your first Orchestrator Workflow
- Next steps
What is VMware Aria Automation Orchestrator?
![]()
VMware Aria Automation Orchestrator (Orchestrator) is a a (mostly) GUI based application which can help you automate and orchestrate a wide range of tasks. Originally an application called Dunes Virtual Services Orchestrator, the company Dunes Technologies was purchased by VMware in 2007. Something of a hidden-gem, Orchestrator has since been included as part of vSphere and/or Aria Automation entitlements.
How can Orchestrator help you?
Orchestrator is an automation and Orchestration solution. You write Workflows which can then be executed. There are a number of pre-canned workflows which can be dragged-and dropped onto a new workflow to execute in sequence. Workflows can have multiple inputs, and you can make some reasonably presentable, dynamic and simple-to-use forms.
This allows you to run simple tasks (“Snapshot a machine”) to more complex, layered solutions with a number of external dependencies. Being VMware, it excels at managing vSphere machines, but it also provides a number of other integrations.
What can I automate with Orchestrator?
Out of the box Orchestrator offers functionality to integrate with a number of VMware Products (vSphere, vRealize Aria Automation, NSX) as well as Active Directory. There are also a number of plugins available for other vendor’s products (such as F5 and Infoblox).
If you can’t find a plugin for your exact requirements, Orchestrator also has the ability to execute PowerShell and SSH on hosts, as well as making SOAP/REST calls to anything with an API.
Assumptions
- I’m going to assume you’ve got as far as having a working Orchestrator server, and you can get logged-in via the web interface.
Your first Orchestrator Workflow
- After logging in, you should be on the dashboard. This shows an overview of the various workflows running on your system.
- On the panel to the right, select Workflows
- Let’s create a folder for your new work. In the right-panel, click + NEW FOLDER. Give your folder a name, and click SAVE. Select your new folder in the navigation pane on the left.

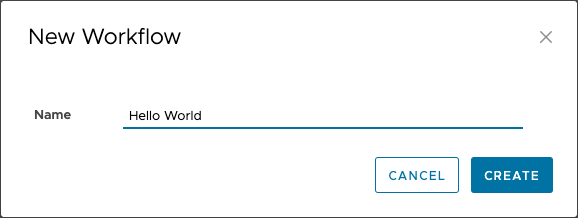
- Now we’ll create a workflow inside that folder. Click + NEW WORKFLOW. Name your new workflow Hello World, and click CREATE.

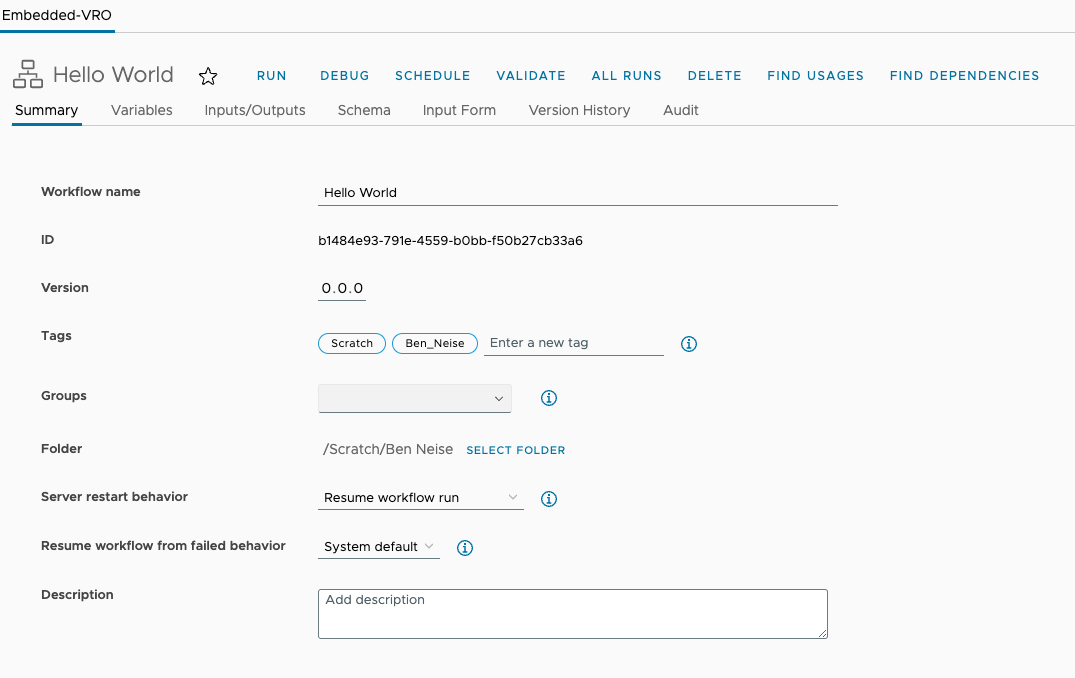
- The workflow will now be opened for editing. On the Summary tab. you can see (among some other things) the Workflow name and Description
- Select the Schema tab. You should see a Scriptable Task in the left pane (if not, search for it). Drag it from that window into the blue line between the green start arrow and the end target
- Click the Scriptable Task, and in the panel to the far right, select the Scripting tab

- Enter the following:
System.log("Hello, world!"); - Click SAVE confirm your changes
- Click RUN arrow above the editing panel
- Click the Logs panel, you should see something like this
2023-11-30 13:19:08.388 +00:00INFO __item_stack:/item1 2023-11-30 13:19:08.391 +00:00INFO Hello, world! 2023-11-30 13:19:08.400 +00:00INFO __item_stack:/item0 - Click CLOSE, then CLOSE again.
Adding inputs
- Back in the Workflows view, click DUPLICATE in the top-right. You should see a new workflow being created called Copy of Hello World
- Select Copy of Hello World and click EDIT
- Change the Workflow name to
Hello you. - Select the Inputs/Outputs tab
- Click NEW and create a new Input, set the name to
name, leave the type as String. (The Array box should be unchecked). - Click the Schema tab again, click on the Scriptable Task
- Expand the Inputs/Outputs section and click the +, select name from the drop-down
- Switch to the Scripting tab, update your script to the following:
System.log("Hello " + name);. You’ll see that name is in green - Click SAVE and confirm your changes
- Click RUN, this time you should get a dialog prompting you to enter your name, type it in, and press RUN.
- Click the Logs tab, you should see something like this
2023-11-30 13:29:25.450 +00:00INFO__item_stack:/item1
2023-11-30 13:29:25.453 +00:00INFOHello Ben
2023-11-30 13:29:25.464 +00:00INFO__item_stack:/item0
Next steps
I’ll add another post soon where you can get the workflow to do something more interesting/useful.